
Project Overview: Working Time: 20 – 30 mins Total Time: 20 – 30 mins Skill Level: Beginner
Although not a common task, draining your home’s plumbing pipes is occasionally necessary. Common reasons include fixing a water hammer problem, shutting down a seasonal property for the winter, or making major plumbing repairs such as replacing or extending the main plumbing lines. Fortunately, draining a home’s plumbing pipes might seem daunting, but it’s actually very easy. Let’s explore the reasons you might want to do this.
Water Hammer: A water hammer, also called hydraulic shock, is a situation where plumbing pipes bang loudly when faucets are turned on and off or when an appliance starts or stops the flow of water. This occurs due to air in the plumbing lines, causing water to oscillate and bang the pipes. Even with air chambers to absorb shock, too much air can persist the problem. The solution is to drain and refill the system to confine air gaps to designated chambers.
Seasonal Shutdown: Draining plumbing pipes is crucial in winter preparation, especially for unattended properties in cold climates. Frozen and burst pipes can cause extensive water damage and costly repairs.
Major Plumbing Repairs: While not always necessary, draining the entire system can be required for major repairs or additions, such as installing a basement bathroom. This prevents water from flowing out when new pipes connect to the existing system.
Draining your home’s water supply pipes and refilling them when the work is done is a very easy process.
What You’ll Need:
Equipment/Tools: Tubs and faucets
Materials: Cloth or plastic wrap (optional)
Instructions:
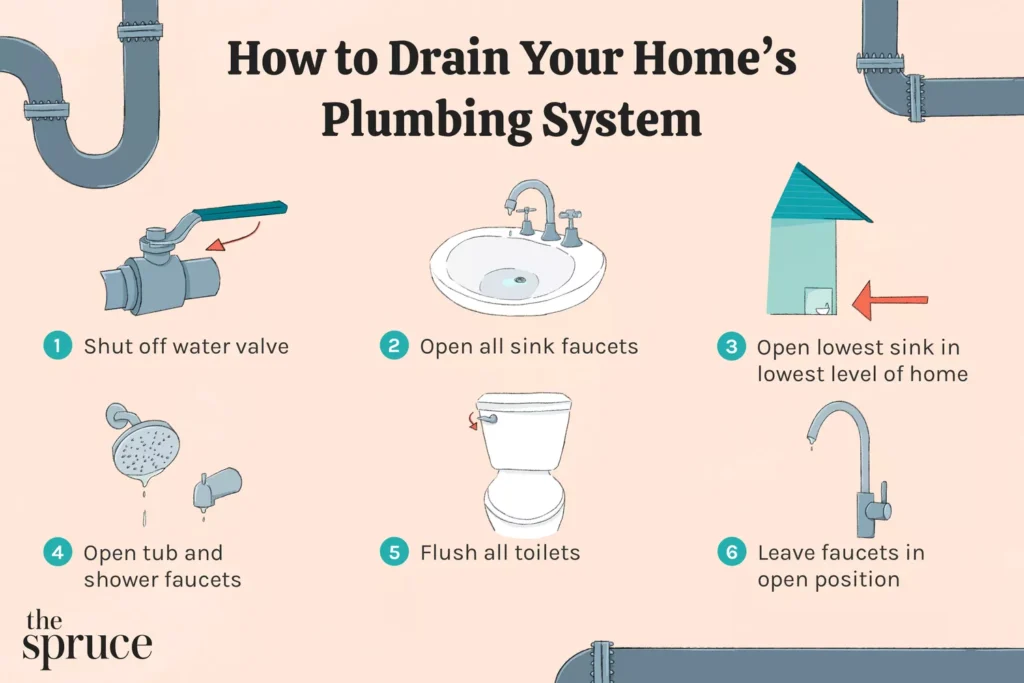
1. Shut Off the Water Valve: Turn off the main water valve at the water meter.
2. Open the Sink Faucets: Starting at the top floor, open all sink faucets to allow air into the system.
3. Open the Faucet in the Laundry Tub: Go to the basement or lowest level and open the faucet in the laundry tub or lowest sink to drain water from above floors.
4. Open the Tub or Shower Faucets: Ensure all tub or shower faucets are open.
5. Flush All Toilets: Flush all toilets to empty the tanks.
6. Leave the Faucets in the Open Position: If leaving the property unattended, such as a vacation home for the winter, leave faucets open.
There should be no water coming out of any faucets, except a possible slight residual drip from the lowest faucet as any remaining water in the pipes dribbles out.
Tip: When a home is left unattended for a long period, standing water in toilets, sink traps, tub drain traps, and floor drains can evaporate, removing the drain seal that keeps sewer gases from rising up into the home. Some experts recommend blocking drains and toilet bowls with wadded-up cloths or plastic wrap to keep the sewer system sealed off from the house during long absences. If you are winterizing, it is imperative that you soak up all the water from toilets, toilet tanks, traps, and anywhere where you would have standing water. When water freezes it expands. This can crack porcelain fixtures, traps, or appliance fittings. If the house is heated to a minimum this may not be required. If the heat will be turned off, you may additionally have to wrap the incoming water service with heat trace & insulation. How to Charge the Pipes With Water: Reversing the water flow and filling all the pipes up again is an easy matter of reversing what you did to drain the pipes. Close the Basement Faucet: Close the basement faucet or lowest level faucet in the house. Close the Upper Faucets: Now close all the upper faucets. Closing the faucets allows air to remain in the pipes to recharge the air chambers you may have in your home’s plumbing system. Tip: It is good practice to close all faucets except the lowest level, for example, the laundry faucet in this case. When you open or re-energize the system it is good practice to open the main valve slowly & only half way. When you get a steady flow of water from the laundry faucet, close it and listen for the system to fill & become fully pressurized. This can be done by listening to water flow. When the flow is no longer heard you can then fully open the valve. If it is a gate valve (round handle), when you get fully opened back off a 1/4 turn. The reason for this is that old valves under pressure can fail when re-energizing. Backing off on the valve will help to keep the valve from freezing (getting stuck) for future use. Open the Main Water Valve: Open the main water valve to let the water back into your pipes. Turn on the Faucets: One by one, starting with the highest level faucets, turn on the faucets and let the air/water sputter out until only clear water flows from the faucet. You may see discolored water come out at first, but this is normal. Open Other Faucets: Open the shower faucets to let water back into those pipes. Flush the Toilets: Flush the toilets to refill the tanks. Turn off the Faucets: Once the water is running clear, turn off the faucets. Start at the highest floor level and work your way down through the house. You may have an occasional sputter the next time you use a faucet, but the pipes will quickly purge any remaining air.