
Project Overview: This project involves replacing a subflooring system under a wall, which may be necessary if the subfloor is water-damaged or structurally unsound. The task is labor-intensive and requires advanced construction skills. The subfloor is a solid base that provides stability for the floor and walls, though it’s not the main support system like beams, posts, and joists. The estimated working time is 4 hours, with a total time of 4 hours, and the yield is a 14-inch section of subfloor removed. The skill level is advanced, and the estimated cost ranges from $30 to $60.
Wall and Floor Basics: The connection between walls and floors forms a structurally tight system. An average home system consists of joists, subfloors, underlayments, floor coverings, and bottom wall plates. Joists are horizontal wooden pieces that support the flooring. The subfloor is nailed to the joists and is typically made of plywood or OSB. Underlayments smooth the subfloor for floor coverings, and floor coverings can vary in type. The bottom wall plate is the base of the wall, with wall studs nailed to it and extending into the subfloor and joists.
Signs of Damage: Subfloor damage is often caused by moisture from flooding, burst pipes, leaks, or excessive humidity. Signs that indicate the need for subfloor replacement include squeaky floors, uneven floors, a musty smell, a loose toilet, and noticeable floor movement when walking.
Removal Before You Begin: Removing the subfloor while the wall is in place is challenging due to the subfloor being trapped under the wall. The process resembles sliding out a book nailed to the ground with someone standing on it.
Instructions: Once the original subfloor is removed, it’s recommended to install the new subfloor with screws to prevent floor movement and cracks in the plywood. Code-approved screws for 3/4 inch plywood subfloors include #8, #9, #10, or #12.
Additional Tips: When replacing a subfloor, it’s crucial to assess if the subflooring is under an exterior or load-bearing wall, as this may require expert assistance. In some unique cases, parts of the subfloor can be removed without taking down the wall.
When to Call a Pro: If the subflooring is under an exterior or load-bearing wall, or if the project escalates beyond your skill level, it’s best to call in a professional.
Replacing a subfloor under a wall can be a challenging task, but with the right approach and patience, it is achievable. It’s important to note that if you wish to keep the wall intact, you can only remove a portion of the subfloor; removing it across an entire wall would necessitate wall removal. A safe width to remove is 14 inches, which is typically the span between two joists or studs.
Always replace the subfloor from the top, even if your home has basement access to the area. To replace a water-damaged or structurally unsafe subfloor, start by removing the floor covering and underlayment above it, then cut out the old subfloor and install new material.
Before starting, ensure safety by turning off any electric circuits at the service panel that run to the area where the subfloor will be removed. Additionally, shut off any affected water lines, using intermediary shut-offs if available, or the main shut-off valve if not.
What You’ll Need:
– Equipment/Tools: Flat pry bar, Circular saw, Utility knife, Oscillating multi-tool and metal blade, Hand saw, Drill, Nail puller
– Materials: Heavy-duty trash bags, Eye protection, Ear protection
Instructions for Replacing a Subfloor Under a Wall:
1. Remove the Baseboard: Gently remove the baseboard and any quarter-round trim near the area where you wish to remove the subfloor, using a flat pry bar. Set these pieces aside.
2. Remove Sections of Drywall: If sections of drywall extend over the floor covering, cut away a section to the required width and about 1 foot high. Place any trash in a heavy-duty trash bag.
3. Remove the Floor Covering: Remove the floor covering directly above the subfloor that you want to remove, and extend the removal a few more inches to provide working space. Laminate and luxury vinyl plank flooring installed parallel to the wall can be lifted. Self-adhesive vinyl tiles will peel off, and sheet vinyl can be pulled back. For ceramic and porcelain tile, break the tiles and chip away the thin-set mortar. Solid hardwood and engineered wood flooring installed parallel to the wall can be pried off, though some boards may be damaged.
4. Remove Any Underlayment: Remove any thin underlayment between the subfloor and the floor covering. For laminate flooring with foam or felt underlayment, use a utility knife to cut away a section. For a 1/4-inch luan (plywood) underlayment board, set the circular saw to the correct depth to cut only into the luan and not any materials beneath it.
5. Cut Away the Nails: Attach a metal-cutting blade to the oscillating multi-tool. While wearing eye and hearing protection, use the tool to cut away all nails that run downward from the bottom wall plate.
The Spruce / Kevin Norris Tip: A nail puller tool, often called a cat’s paw, can dig into the wood of the plate or subfloor around the nail head. This allows for the nail to be pulled out rather than cut, completely removing the nail and preventing the subfloor from getting hung up on uncut portions.
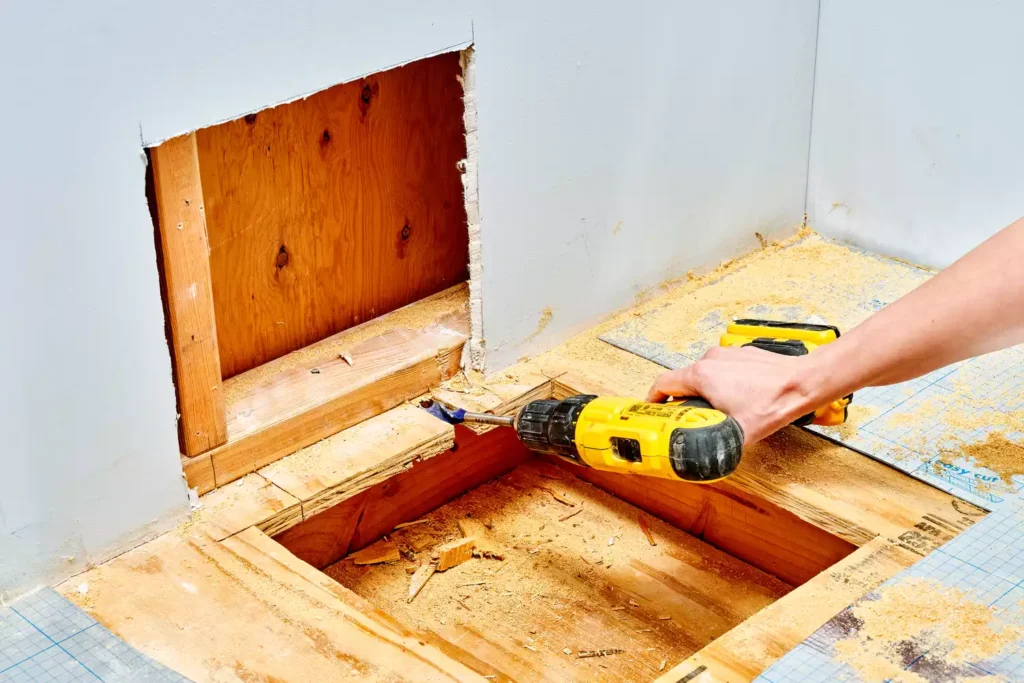
Cut Away the Subfloor: Set the circular saw to the proper depth to cut only the subfloor and not the materials below. Remember, circular saws can’t cut flush with the wall. Cut as close as possible, usually within an inch or two. Then, make two more cuts with a hand saw along the side of the cut-out square until reaching the wall’s bottom plate. Remove the Subfloor From Under the Wall: If the subfloor is heavily rotted, pull back the remaining section and remove it by hand. If not, attach a 3/4-inch auger bit to the drill and drill to a depth of 3 1/2 inches underneath the wall bottom plate on both sides of the rotted area. The auger bit acts as a saw to cut away the wood. If the subfloor’s edge rests on the joist, it should pull out. If not, proceed to the next step. Remove Subfloor From the Other Side (If Necessary): If the subfloor is a continuous sheet extending beyond the wall, repeat the previous steps on the other side. Otherwise, you won’t be able to pull out the section you’re working on. Inspect the Joists: Removing the subfloor gives a better view of the joists. If damaged, fix or replace them. Reinforce damaged joists with an additional support joist using heavy-duty adhesives. Install New Subfloor: Measure and cut a new section of subfloor to fit the space. For plywood or tongue-and-groove flooring, ensure the joint connection is centered on a joist. Screw and adhere the plywood to the joists. Adding glue reduces squeaking or creaking sounds. Install the Top Flooring: If in good shape, reinstall previous flooring like hardwood, engineered wood planks, or carpeting. Or replace it entirely. If it’s a problem spot prone to leaks, consider waterproofing. Tips for Replacing Subflooring: Replacing subflooring from above is often better as gravity won’t be working against you. You’ll have a better view and can easily remove old nails and other materials. Tongue-and-groove flooring is more secure and provides a stronger, sturdy, and stable connection. Use adhesive for an even stronger hold. Leave space for expansion and contraction as wood and particle board are porous and will expand and shrink with heat, humidity, and cool temperatures.Plan for this by leaving 1/8 inch space between sheets as you lay out the subflooring. Give the wood time to adjust. Plywood and subflooring materials should have a few days to adjust to the room’s temperature and humidity before being laid. The wood may expand or contract during that time.
Smooth out the edges. Sand down the corners or edges of panels that stick up or out. Ensure the entire floor is level and even. Be realistic about the scope of work. Often, people underestimate how much work a project will take. Replacing subflooring sounds easy enough, but if it’s damaged and extends past a wall, it might require the wall (or a section of it) to come down. Consider calling a contractor if a project seems like a lot for you. In the end, it might be cheaper, quicker, and better if you get a contractor to help. When to Call a Professional. It may be time to hire a professional if you need to replace the entire subfloor under an exterior wall or a load-bearing wall. Special considerations must be made to prevent the walls from sagging or hanging down while the subfloor is not in place to support them. Smaller subfloor sections—up to about 14 inches wide between joists—can be cut out and replaced without needing extra support. FAQ. Is it expensive to remove and replace a subfloor? The cost to replace your subfloor depends on the amount of subfloor needed and the material used. Replacing a standard plywood subfloor typically costs about $1.50 per square foot, or roughly $594 for a 306-square-foot room, including labor.1 Can a DIYer replace a subfloor on their own? Replacing a subfloor is not difficult to learn, but it is labor-intensive and time-consuming. DIYers who tackle this project on their own should ensure they’re comfortable with removing and reinstalling flooring, drywall, and trim before beginning. Do walls sit on top of subfloor? Walls are built on top of a home’s subfloor, so replacing the subfloor can sometimes require removing the walls. What is a key sign the subfloor needs replacement? If you notice water damage, it is usually a sign that the subfloor should be replaced. A water-damaged floor can develop musty smells, creaking, and floor movement. What material should you use for a subfloor? The subfloor is usually plywood, oriented strand board (OSB), or occasionally particleboard. Subflooring vs Joists vs Underlayment: What’s the Difference? Article Sources. The Spruce uses only high-quality sources, including peer-reviewed studies, to support the facts within our articles. Read our editorial process to learn more about how we fact-check and keep our content accurate, reliable, and trustworthy. What’s the Average Cost of Subfloor Replacement? HomeAdvisor.